The Power of Asynchronous Javascript
For this set of exercises, use JsFiddle. You can write pure Javascript in the lower-left corner and HTML in the upper-left corner.
Today, we are going to take what we have seen with Javascript and make our Javascript tool kit even more powerful by introducing the asynchronous capabilities of JavaScript. When a computer program is asynchronous, that means that it is functioning in such a way that the program doesn't block other running programs from completing. A great example of this behavior occurs when retrieving data from the Internet. Instead of pausing the execution of all other programs, we can write code in such a way that makes a request for some data via HTTP, and allows us to continue living our lives while we wait for that data to be returned to us.
Intro to Networking
To make all of this clearer, let's take a brief tour into computer networking. To begin, computer servers are simply computers themselves which are used to provide services, data or resources to other computers (clients). In general, computers on a network are modeled in client-server relationships. This means that one computer "serves" information to a "client" (or a "customer", to use the server metaphor in a restaurant), and the client computer receives responses from the server. This pattern of communication dominates the entire internet (and Internet).
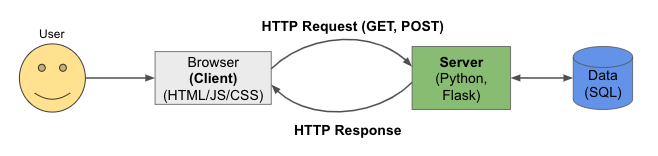
When a client sends a request, that request contains some information:
- a request method in the form of an HTTP verb, like GET or POST
- a URL, which consists of:
- a domain and hostname (such as "google.com")
- a path to a resource, such as the string leading to the file to be retrived or modified
- parameters and/or a query string
- Headers which contain extra info, such as the host, form data, and cookies
When a request comes from the browser in the form of a GET for a resource like an HTML or CSS file, the browser will render the web page using those resources. Additionally, the response will include a code, such as:
- 2xx: means that everything went OK or successfully
- 3xx: means that the request was redirected to some other place
- 4xx: means that there was an error, and that error happened on the client side
- 5xx: means that there was an error, and that error happened on the server side
Additionally, a server can send a cookie in response to a browser. A has unique information pertaining to a user, or a session, or anything else that might help make the user's experience better. The browser will store the cookie, and later, if the browser sends a request to that domain again, it will attach the stored cookie.
On the backend server, the process includes these steps:
- receive the request
- parse the request (extract the method, path, parameters, and any other useful info)
- routing: using the path, find the requested resource
- session: using the cookie, find info related to the user and session
- authenticate: check if the user is logged-in and authenticated
- database access: look up any access required for the data layer
- Processing and computation
- Templating (fit everything into an HTML template)
- Send a response
Back to the Lab
Today, we will be using Javascript to make requests for data using HTTP! To get started, here is a code snippet of HTML that you will use to begin this lab. We will be adding code to this snippet by following the steps one at a time.
<!DOCTYPE html>
<html>

</html>
- First, we will need to build our HTML a bit. To do this, add a
<head>element to your HTML. Within the HTML head, add a<title>element and include this text within the title: Async Javascript Example. - Next, add a
<body>element to your HTML. - Within the body, add an
<h1>element and include this text in the heading: Async Javascript Example. - Add a
<button>element within the body. Give this button an "id" field and call the id, "fetch-button". Within the button text itself, call the button "Fetch Button". - Finally, in the HTML below the button, add a division, or
<div>, tag. Give this tag an id as well, and call that id "output". - At this point, take a pause, and double-check that you have included all of the elements of your HTML.
- Now, add a
<script>tag. We are going to add some Javascript! - The first thing we are going to do is add an Event Listener. If you need a refresher on what an Event Listener is,
check out the Lecture 4 lab and demo. Start with the
document, and then get an element by its id (look it up if you don't happen to remember how to do this! hint:getElementById) to get our "fetch-button" that we made earlier. Then, add an event listener so that when the fetch-button is clicked, a new function called "fetchData" is invoked (to do all of this, you may need to refresh on getElementById and addEventListener). - now, let's make a function called "fetchData". Go ahead and add that function signature.
- In our function, we are going to use a Javascript API called
fetch. Fetch is an API interface which allows us to perform HTTP requests. So, we are going to make an HTTP GET request to retrieve some data. To begin, make a call to fetch like this (you can copy this code):function fetchData(){ fetch(); } - Within the parentheses of the call to fetch(), add this string:
'https://jsonplaceholder.typicode.com/posts/1'. This is a "fake" endpoint with some dummy data for us to grab. - Then, at the end of your call to fetch, add ".then()". then() is a function which tells the computer how to handle what is returned by the fetch call.
- Now, we are going to include something called a "fat arrow function" in Javascript. This is basically a syntactic shorthand
for a function definition. To add our arrow function, add the below, so the Javascript code looks like this:
function fetchData(){ fetch('https://jsonplaceholder.typicode.com/posts/1') .then(response => { // we will fill this in next }); } -
In between the curly brackets, where are handling the response, add this code:
if (!response.ok) {
    throw new Error('Network response was not ok');
}
return response.json();
This code handles the error in the event that there was some network problem, and if things were successful, then it returns a JSON (Javascript Object Notation) representation of the response. -
We are almost there! Finally, we are going to add one more then() call to display the data in our HTML (you may be getting the idea, correctly,
that in Javascript we can chain these method calls together). So add one more call to then(), like so:
.then(data => { // last piece to add, here }) - Within the curly brackets of this most-recent arrow function, we want to manipulate the DOM to render the data we just retrieved. Before going further, think about how we would do that! (hint: we want to use getElementById...which element id do we want to display the output of our fetch?)
-
When you have that figured out...chain this method call:
.textContent = JSON.stringify(data, null, 2);
In brief, this allows us to show the data we retrieved as a string. - Great job!! Now, click that button and see what all of your hard work amounted to!
- Here are a couple other urls to try, to see some neat data depending on your interest:
- Player data about the Chicago Bears football team from the ESPN API:
'https://sports.core.api.espn.com/v2/sports/football/leagues/nfl/seasons/2023/athletes/4362887' - reddit subreddits and other public content around WallStreetBets:
'https://www.reddit.com/r/Wallstreetbets/top.json?limit=10&t=year' - NASA:
'https://api.nasa.gov/neo/rest/v1/neo/browse?api_key=DEMO_KEY'
- Player data about the Chicago Bears football team from the ESPN API: