Introducing Flask: Our Lightweight Server
Hello! Today, we will be introducing servers as part of our continued journey into the world of networking. To do so, we will discuss Flask, a lightweight server solution using Python. We will be using the Repl.it here.
Intro to Networking
We have seen this information in our last lab, and we are repeating it here, as well (so this information should look very familiar. If you are clear on all of this, feel free to skip to the "Back to the Lab" section below).
To make all of this clearer, let's take a brief tour into computer networking. To begin, computer servers are simply computers themselves which are used to provide services, data or resources to other computers (clients). In general, computers on a network are modeled in client-server relationships. This means that one computer "serves" information to a "client" (or a "customer", to use the server metaphor in a restaurant), and the client computer receives responses from the server. This pattern of communication dominates the entire internet (and Internet).
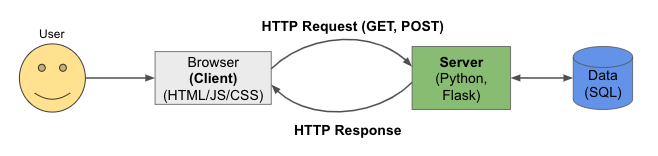
When a client sends a request, that request contains some information:
- a request method in the form of an HTTP verb, like GET or POST
- a URL, which consists of:
- a domain and hostname (such as "google.com")
- a path to a resource, such as the string leading to the file to be retrived or modified
- parameters and/or a query string
- Headers which contain extra info, such as the host, form data, and cookies
When a request comes from the browser in the form of a GET for a resource like an HTML or CSS file, the browser will render the web page using those resources. Additionally, the response will include a code, such as:
- 2xx: means that everything went OK or successfully
- 3xx: means that the request was redirected to some other place
- 4xx: means that there was an error, and that error happened on the client side
- 5xx: means that there was an error, and that error happened on the server side
Additionally, a server can send a cookie in response to a browser. A has unique information pertaining to a user, or a session, or anything else that might help make the user's experience better. The browser will store the cookie, and later, if the browser sends a request to that domain again, it will attach the stored cookie.
On the backend server, the process includes these steps:
- receive the request
- parse the request (extract the method, path, parameters, and any other useful info)
- routing: using the path, find the requested resource
- session: using the cookie, find info related to the user and session
- authenticate: check if the user is logged-in and authenticated
- database access: look up any access required for the data layer
- Processing and computation
- Templating (fit everything into an HTML template)
- Send a response
Back to the Lab
So far, we have seen an example of very basic communication over HTTP using Javascript and the fetch() API. The data
that we were able to retrieve from last time itself came from a server. Today is all about writing the code to make your
own server, so that you can eventually send your own data to the front-end of your application (for example).
To get started, open up the Repl.it called "Python Flask Server Lab". You should be facing an empty main.py file;
we will build this file throughout the lab.
- First, make sure that Flask is installed as part of the repl.it package manager. To do this, open the Package Manager, search for "Flask", and click install (or check to make sure that it is already installed).
-
Make sure to import the correct Python packages:
from flask import Flask
- Next, include this snippet of code in your
main.py:app = Flask( # Create a flask app __name__, template_folder='templates', # Name of html file folder static_folder='static' # Name of directory for static files )
-
Then, actually start the application server running. Add this code and click "run" in Repl.it.
if __name__ == "__main__":  # Makes sure this is the main process
app.run( # Starts the site
    host='0.0.0.0',  # Establishes the host, required for repl to detect the site
    port=random.randint(2000, 9000)  # Randomly select the port the machine hosts on.
)
The "host" in this case is the IP address, which is a unique address that every computer on the network has. The "port" is a kind of virtaul endpoint that the server binds to. There are as many as 65,535 such ports, although some ports are reserved for specific purposes (for instance, SSH servers listen for connections on port 22). Think of an IP address as the address of an Illinois Wesleyan dorm, and a port is a room within the dorm. When a client connects to your server, they "go to your dorm" and then "go to your room" once inside the dorm. -
To add a web page to your server, Flask has the concept of
routes, which are used as Python decorators (recall that a decorator is a fancy and syntactically-concise way to wrap a function). To add the first page to your server, add this code:@app.route('/') # '/' for the default page def home(): return "I love CS253!" -
That's not bad, but we can also leverage Flask's
render_template()function to display actual HTML, as well. Try this code next:def base_page(): return render_template( 'base.html', # Template file path, starting from the templates folder. ) -
Then, in a file called
base.html, include this simple header:<h1>Hello, there!</h1>
You should then, when you run your code, be able to see your HTML rendered in the browser (cool!). -
There's one last thing we will try for today. We will add a variable in our server which we can use in our template.
To do this, add
var_name=variableand the template will be able to read your variable by using{{ var_name }}.@app.route('/') # What happens when the user visits the site def base_page(): random_num = random.randint(1, 100000) # Sets the random number return render_template( 'base.html', # Template file path, starting from the templates folder. random_number=random_num # Sets the variable random_number in the template ) -
Finally, in your HTML file as:
<h1>The number is {{ random_number }}</h1> -
If you have additional time, here are some things to try:
- try passing more than just a simple integer to your applications (Python dictionary, list)
- try iterating over a data structure, like a Python list, and render each item to the HTML
- create a css file and add it to your static files directory to add css to your server application